TruEmbroidery™ 3 Software Newsletter December 2015
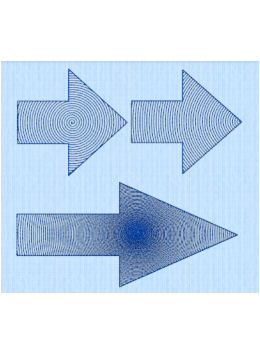
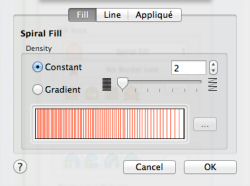
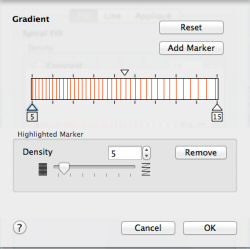
Welcome to the TruEmbroidery™ 3 newsletter. This month we will take a look at the Design Player and share how to make unique designs using the Spiral Fill tool in Create.
 Icons
Icons
The Design Player ![]() can be found in all three Applications and is in both TruEmbroidery™ 3 and TruEmbroidery™ software. You can use the Design Player to
play through the stitches in the embroidery project as if it was being stitched from an exported embroidery.
can be found in all three Applications and is in both TruEmbroidery™ 3 and TruEmbroidery™ software. You can use the Design Player to
play through the stitches in the embroidery project as if it was being stitched from an exported embroidery.
All parts of the embroidery project that are within the hoop area are shown, whether or not they are selected. The current Optimize for Sewing settings from TruE™ 3 Configure are used. All the designs in a multipart embroidery are shown in the Design Player. This is a great way to see the whole project after adjusting stitches in one of the designs.
In TruE™ 3 or TruE™ Modify, designs are shown in 3D ![]() or
2D with
or
2D with ![]() or without
or without ![]() Stitch Points,
depending on the current View Mode. In TruE™ 3 or TruE™ Create,
designs are shown in 3D
Stitch Points,
depending on the current View Mode. In TruE™ 3 or TruE™ Create,
designs are shown in 3D ![]() or 2D
or 2D ![]() ,
depending on the current View Mode. (If in Outline mode, designs are shown in 2D.)
,
depending on the current View Mode. (If in Outline mode, designs are shown in 2D.)
Click ![]() to Start or pause play or
drag the slider
to Start or pause play or
drag the slider  to go at your own pace. Click
 ![]() to Play at double the current speed. Continue to
click
to Play at double the current speed. Continue to
click ![]() to play even faster.
Click
to play even faster.
Click ![]() to Jump to the first stitch.
Click
to Jump to the first stitch.
Click ![]() to Jump to the last stitch. Click
to Jump to the last stitch. Click ![]() to Rewind.
The Design Information area shows you the number of stitches, number of colors, and the design height and width. For more information on this feature,
shortcuts and a quick exercise, click the help button
to Rewind.
The Design Information area shows you the number of stitches, number of colors, and the design height and width. For more information on this feature,
shortcuts and a quick exercise, click the help button ![]() . Click Close when you have finished watching your design(s) stitch.
. Click Close when you have finished watching your design(s) stitch.
 Tips and Techniques