TruEmbroidery™ 3 Software Newsletter July 2015
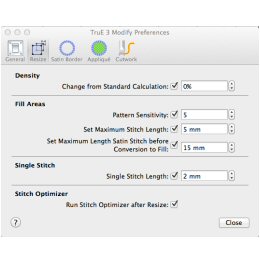
Welcome to the TruEmbroidery™ 3 newsletter. This month we will take a look at the View Modes feature in all applications and Resize settings in TruE™ 3 Modify.
 Icons
Icons
Different View Modes are very useful in TruEmbroidery™ software. In the TruE™ 3 Studio and TruE™ Studio applications the modes consist of 3D View, 2D View, and Realistic 3D. In TruE™ 3 Modify and TruE™ Modify the modes are 3D View, 2D View with Stitch Points, and 2D View without Stitch Points. Finally, TruE™ 3 Create and TruE™ Create have 3D View, 2D View, and Outline View.
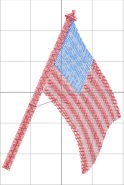
In TruE™ 3 and TruE™ Studio you can use 3D View to see embroideries, background and grid in standard 3D mode. The stitches of the embroideries have three-dimensional shading.
All editing functions are available, and the selection box is shown. To view embroideries in standard 3D, click the 3D View button ![]() on the toolbar or
choose View > View Mode > 3D View Mode from the Menu bar.
on the toolbar or
choose View > View Mode > 3D View Mode from the Menu bar.
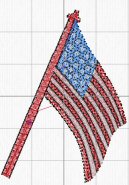
You can see the individual stitches in your embroideries as lines with no shading in TruE™ 3 and TruE™ Studio, by selecting 2D View mode. To view embroideries in 2D click the
2D View button ![]() on the toolbar or choose View > View Mode > 2D View Mode on the Menu bar. Stitches are automatically displayed in 2D when you select the Modify window.
on the toolbar or choose View > View Mode > 2D View Mode on the Menu bar. Stitches are automatically displayed in 2D when you select the Modify window.

In TruE™ 3 and TruE™ Studio you can view embroideries and background in 3D without selection boxes, grid or hoop by
clicking Realistic 3D ![]() on the toolbar or choose View >
View Mode > Realistic View Mode from the Menu bar. You can use the zoom commands, but editing functions are not available.
on the toolbar or choose View >
View Mode > Realistic View Mode from the Menu bar. You can use the zoom commands, but editing functions are not available.
In the TruE™ 3 and TruE™ Modify applications you can use 3D View Mode to see embroideries and grid in standard 3D mode. The stitches of the embroideries have three-dimensional shading.
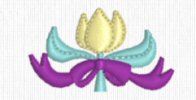
To view embroideries in 3D View Mode, click the 3D View Mode button ![]() on the toolbar or choose View > View Mode > 3D View Mode on the Menu bar. The design looks the same as in Studio in 3D View Mode.
on the toolbar or choose View > View Mode > 3D View Mode on the Menu bar. The design looks the same as in Studio in 3D View Mode.
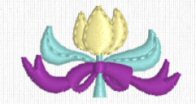
In TruE™ 3 and TruE™ Modify, use 2D View without Stitch Points to see the individual stitches in your embroideries as lines with no shading or stitch points. To view embroideries in 2D View without
Stitch Points, click the 2D View without Stitch Points button ![]() on the toolbar or
choose View > View Mode > 2D View without Stitch Points on the Menu bar. The design looks the same as in Studio in 2D View Mode.
on the toolbar or
choose View > View Mode > 2D View without Stitch Points on the Menu bar. The design looks the same as in Studio in 2D View Mode.
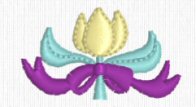
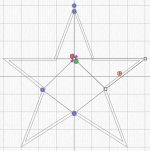
An added feature in TruE™ 3 and TruE™ Modify is to see the individual stitches in your embroideries as lines with no shading, and to display the black dots that show the stitch points (needle insertions) into the fabric. To do this you can select 2D View with Stitch Points. To view embroideries in 2D View with Stitch Points click the 2D View with Stitch Points button on the toolbar or choose View > View Mode > 2D View with Stitch Points on the Menu bar. When you zoom in, the stitch points are displayed as small squares. Showing the stitch points may be helpful for inserting new stitches, moving stitches and pasting stitch blocks.
In the TruE™ 3 and TruE™ Create Applications, to see the outline of an object with no stitches click
the Outline button ![]() on the toolbar or choose View > View Mode > Object View Mode on the Menu bar.
on the toolbar or choose View > View Mode > Object View Mode on the Menu bar.
 Tips and Techniques