TruEmbroidery™ 3 Software Newsletter May 2015

Welcome to the TruEmbroidery™ 3 newsletter. This month we will share with you how to use Individual lettering and how to create your own Motifs.

Flower Icons

icon

Individual Lettering is available in both TruE™ 3 and TruE™ Studio. Use this feature to be able to move and resize the letters individually, for example to create larger initial letters. Individual lettering can be used with a number of Line Types: Horizontal, Diamond, Pennant Right, Pennant Left, Perspective, and Italic.

Line Type

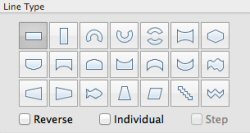
To use Individual lettering, simply place a checkmark in the Individual box on the Letter tab before clicking Apply.

Lettering

The design on the upper right was created without Individual checked. The design on the lower left was created using Individual lettering, with the M and F sized larger.

Flower Tips and Techniques

tips and techniques

Last month we looked at how to create Motif Fills; now let's see how to create our own Motif. This feature is available only in TruE™ 3 Create, part of the TruEmbroidery™ 3 ELITE software package. Use Create Motif from Selection to save a running stitch design to the My Motifs database.

The first step in creating a motif is to choose Running Stitch Running Stitch in the Line area. Then select Freehand Point Line Freehand Point Line and draw a simple design. You can also bring in a background picture to trace around.

Control points

Place points, using the Command key to create corner or square points, to draw the outline from left to right. Double-click or press Return to finish the line. Try to start and finish on the same horizontal line.

The start and end stitches should always be aligned horizontally, with the start stitch on the left and the end stitch on the right. If the motif is saved with start and end stitches that are not level, or are reversed, a stitch will be added, or the motif will be automatically rotated when it is used to make a motif fill area or a motif line. The rotation forces the start and end stitches to be aligned from left to right.

Alignment warning

Ensure that the outline is selected. Choose Object > Create Motif from Selection. If the first and last stitches are not aligned horizontally, a message appears to give you the option to rotate the motif or add an alignment stitch. Click the desired option and then export the motif to the My Motifs database.

Best wishes from TruEmbroidery™ 3 Software

P.S. Watch for the TruEmbroidery™ 3 newsletter next month when we will look at the Rotate 45 feature in TruE™ 3 Studio and Command Markers in TruE™ 3 Modify and TruE™ 3 Create.