TruEmbroidery™ 3 Software Newsletter November 2015

Welcome to the TruEmbroidery™ 3 newsletter. This month we will share with you what is available in the Actions menu in all Applications and how to make unique designs using the Shape Fill feature in Create. We are also pleased to inform you that there is a TruEmbroidery™ 3 Software update available (version 3.2), which provides new thread colors as well as improvements in speed and responsiveness. Use Smart Update in TruE™ 3 Configure to download it today!

Flower Icons

icon

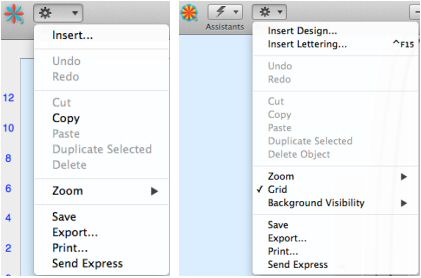
The Actions button has several features grouped under it. Those features depend on the application. You can use the Actions menu Actions to get quick access to many frequently used functions. The menu shown here is from TruE™ 3 Studio.

Common to all applications are Undo/Redo, Cut, Copy, Paste Duplicate Selected, Delete, Zoom, Save, Export, Print, and Send Express. Then for example, if the app has the ability to use a background, there are Background Visibility features. Shown here are the TruE™ 3 Modify, and TruE™ 3 Create Actions menus.

Menus

Edit-Insert menu

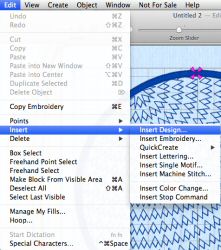
In TruE™ 3 or TruE™ Create you can open the Actions Menu, then select Insert Design. Alternatively, you can go to the Edit tab, click Insert, then select Insert Design. The Save and Export tools are found on the File tab. The Grid tool is found on the View tab. With the Actions Menu, you do not need to remember on which tab those commonly used tools are located.
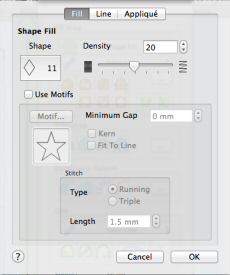
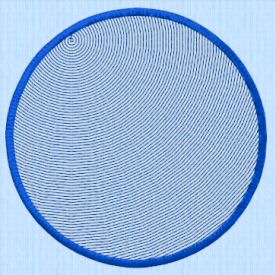
Flower Tips and Techniques

tips and techniques

You can create unique designs easily with the Shape fill feature in the TruE™ 3 or TruE™ Create Application. Shape Fill areas Shape Fill use one of 75 different shapes from an origin point that can be moved to create different effects.

Vary the stitch density, use running stitch or motif lines for the fill and add holes. Open the Shape Fill properties dialog to set all the properties on a shape fill area. The lower the Density number, the closer together the stitches and the more stitches are produced. You can set Density from 2 to 40.

Shape Fill

Use a motif line instead of a plain line to follow the shape selected for the fill. Minimum Gap is in addition to any spacing that is part of the selected motif. Select how the motifs follow the curves of the line with Fit To Line: when Fit To Line is off, the ends of each motif are placed on the line, while when Fit To Line is on, each whole motif is adjusted to fit along the line.

Kern automatically increases the space between adjacent motifs, so that the motifs fit along the line without overlapping. Select between Running and Triple stitch for stitching out the motif line. Set the maximum stitch Length from 1 to 6mm in steps of 0.1mm. Note: Length is initially set to the recommended value for each motif.

Circle

This design uses a Circle shape with the origin moved to upper left. The design at the beginning of the section also shows a Circle shape with origin moved to upper left, but with a motif instead of running stitches.

Best wishes from TruEmbroidery™ 3 Software

P.S. Watch for the TruEmbroidery™ newsletter next month when we will look at the Design Player found in all Applications, and see how the Spiral Fill tool works in Create.