TruEmbroidery™ 3 Software Newsletter September 2015

Welcome to the TruEmbroidery™ 3 newsletter. This month we will share with you how to use MultiWave Fill, in addition to the Draw tools in Modify.

Flower Icons

icon

MultiWave Fill is a tool found both in the TruE™ 3 Create and TruE™ Create applications. MultiWave Fill areas MultiWave Fill use a wave pattern defined by a line, or lines, drawn on the fill area. Vary the density, or use a motif for the stitch lines.

MultiWave Properties

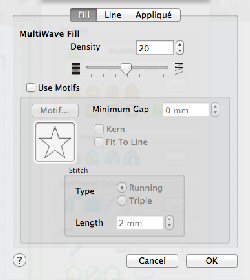
To show the properties dialog of an existing MultiWave fill, click a MultiWave fill area so that the points defining its shape are shown, then Control-click and choose Properties. Before creating a MultiWave Fill, select MultiWave Fill in the pop-up menu in the Fill Area section of the Create window, then click the button with the ellipsis (3 dots). You can change the Density, use a Motif, choose between a running stitch and triple stitch, and the stitch length.

Adjusted MultiWave line

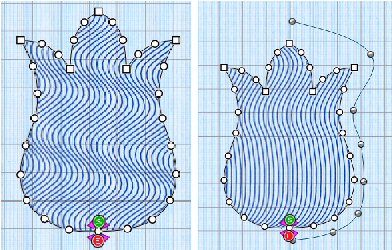
The default pattern for the MultiWave Fill area is shown in the picture on the left. You can change the direction of the stitch lines, or add texture, with Freehand Tablet MultiWave Line Freehand Tablet Wave Line or Freehand Point MultiWave Line Freehand Point Wave Line. The design pictured at right shows how a MultiWave Line can influence the wave of the design. Add more interest by adding more lines.

Use a Motif instead of straight stitches for a different effect, as pictured in the design at the beginning of the section. A Candlewicking stitch was used for the Motif. To delete a MultiWave line from the currently selected MultiWave Fill area, use Delete MultiWave Line Delete Wave Line (found on the Edit Page). To remove an individual point from the currently selected MultiWave Fill area use Delete a Point Delete Point (also found on the Edit Page).

Flower Tips and Techniques

tips and techniques

When editing or viewing a design's construction in TruE™ 3 Modify there are several tools on the Control Strip to help you. Use the Control Strip to view the colors in the selected section of the embroidery, and to select stitches using the handles on the slider bar.

For precise positioning, enter numbers in the start and end boxes, or select stitches within the next Draw Next Color or previous DrawPreviousColor color block. View the whole embroidery with Display All Draw All Stitches, or see an outline of the hidden stitches with Ghost Mode Ghost Mode. (In the original TruE™ Modify application the Control Strip was available, but did not show the colors on the strip.)

The draw Start and End slider bars in the Control Strip provide a very powerful way of viewing an embroidery and understanding exactly how it is formed. They allow you to progress forwards and/or backwards through an embroidery stitch by stitch and isolate a specific sequence of stitches. If desired, select the visible stitches as a block to work on (Make Block From Visible Area Make Block From Visible Area) or use a feature such as Global Morphing without affecting the hidden stitches.

You can use Ghost Mode Ghost Mode to show the overall shape of the embroidery while only working on visible stitches. Changing the range of stitches can be combined with selecting colors to display a particular set of stitches that would be difficult to isolate with other functions. Use Ghost Mode Ghost Mode to display pale 'ghost' stitches where there are hidden stitches. This allows you to see the overall embroidery and the placement of the visible stitches within the embroidery while working only with the visible stitches.

The left handle and left stitch number box set the Draw From Start stitch number. The right handle and right stitch number box set the Draw To End stitch number.

Use the Draw Range to set the Start or End stitch number in any of the following ways, as shown here for Draw From Start:

  • Drag the handle along the slider bar. The stitch number changes as you move the handle.
  • Click the arrows at the end of the number boxes to change the stitch number by one at a time. Click and hold on an arrow to progress more rapidly.
  • Click in the space on the slider bar on either side of the handle to move it to the point where you click, or to the other handle if that is closer.
  • Enter a stitch number directly in the stitch number box. A number that is outside the range is ignored.

In all cases, the work area will show the range of stitches as the Start or End number changes. In the picture, Ghost Mode is on.

Ghost Mode

Best wishes from TruEmbroidery™ 3 Software

P.S. Watch for the TruEmbroidery™ newsletter next month when we will look at the Background feature in Studio and how to design your own lace in Create.