TruEmbroidery™ 3 Software Newsletter April 2016

Welcome to the TruEmbroidery™ 3 newsletter. This month we will look at the Reverse Stitch Order feature and how to create an echo fill design.

Flower Icons

icon

Reverse Order is used to reverse the stitch order of a selected block. For example, if a block of stitches making a shape from left to right is selected and mirrored horizontally, using Reverse Order will prevent long movement stitches going across the shape after it have been mirrored.

When Reverse Order is used, only continuous sets of stitches have their order reversed. This ensures that the order of color blocks is preserved, as well as the sequence of stops and trims. The Reverse Order of Stitches tool Reverse Order of Stitches can be found in the Design Window of the Control Panel in TruE™ 3 or TruE™ Modify. Let's see how it works. For example, perhaps you want to stitch out a motif, but also want to mirror the design vertically and horizontally.

Single Motif

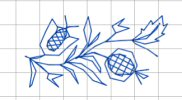
A single motif will stitch from left to right. The motif shown here is from the Universal Category, Flowers & Leaves 1 Category, Motif 12.

Motif

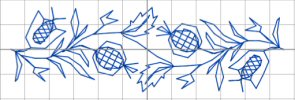
The combination of two motifs will stitch to the middle from the left, then jump to the right and stitch back to the middle. To have it stitch continuously from left to right, select the second motif, then click Reverse Order of Stitches. The combination will now stitch from left to right.

Flower Tips and Techniques

tips and techniques

This month we will learn how to create an Echo fill design. Echo fill Echo Fill is new to TruEmbroidery™ 3 software, and places echo or shadow lines within and/or around a shape. Choose from rounded, square and diagonal corners, set the gap between the echo lines and the number of lines, and select the stitch type and length.

To create an echo fill design in the Create Application, select Echo Fill for Area type and whatever you would like for the border. Select Fill Area Options to open the Echo Fill properties dialog. This enables you to place echo lines within a shape. Set the style, gap, stitch type and stitch length. (You can also create some styles of echo fill in a quilt block using the QuiltBlock Assistant in TruE™ 3 Studio)

Echo Fill Properties

Choose from 1, 2 or 3. 1 Echo Fill Rounded Corners creates rounded corners, 2 Echo Fill Square Corners creates square corners, 3 Echo Fill Diagonal Corners creates diagonal corners. Rounded corners is initially selected. Select a line type for the echo lines in the fill. Choose from Running Stitch, Double Stitch, or Triple Stitch.

Set the Spacing to the preferred distance between lines of stitching, from 2mm to 20mm in steps of 0.1mm. It is initially set to 5mm. Set the stitch length for the echo lines from 1 to 6mm in 0.1mm steps. The initial setting is 1.2mm.

Pictured below left is the Internal Fill option with Style 1. The next picture, second from left, is the Internal Lines option with 5 Echo Lines with a 5mm Spacing, Style 1. The next picture, second from right, is the Internal Lines option with 5 Echo Lines with a 5mm Spacing, Style 2. The far right picture is the Internal Lines option with 5 Echo Lines with a 5mm Spacing, Style 3.

Comparison of Echo Fills

Pictured below left is the External lines option with 3 Echo Lines and a 5mm Spacing and Style 1. The middle picture is Style 2. The right picture is Style 3.

External Echo Fill

Pictured below left is the External & Internal lines option with 3 Echo Lines and a 5mm Spacing and Style 1. The middle picture is Style 2. The right picture is Style 3.

Internal and External Echo Fills

Best wishes from TruEmbroidery™ 3 Software

P.S. Watch for the TruEmbroidery™ newsletter next month when we will look at how the Delete Commands tool works and how to create a Satin Area.