Tips and Techniques
This month we'll review how to import Letters and convert their properties to create many unique looks.
We'll discuss how to use the Edit menu to Insert Lettering into TruE™ 3 Create, part of the TruE™ 3 ELITE software package.
 To add Lettering as objects, select the Edit menu, then Insert > Insert Lettering.
Note the other Insert options for Design (.edo) files, embroideries, the QuickCreate Assistant to add additional .edo elements, and Single Motif or Machine stitches!
To add Lettering as objects, select the Edit menu, then Insert > Insert Lettering.
Note the other Insert options for Design (.edo) files, embroideries, the QuickCreate Assistant to add additional .edo elements, and Single Motif or Machine stitches!
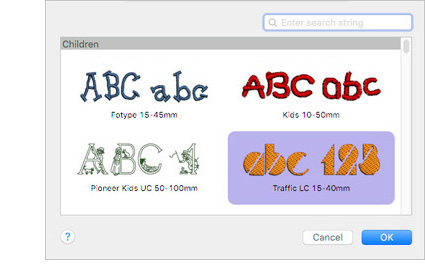 In the Insert Lettering dialog box, the Font View icon
  displays a visual gallery of all the available fonts,
including those made with QuickFont
displays a visual gallery of all the available fonts,
including those made with QuickFont  !
!

Type or select a Letter in Insert Lettering, and select an initial size. Insert

adds the letter to your hoop.
When you add multiple letters at once, they will align and space themselves in the work area.
Mix and match Lettering by changing the Collection and Font before adding the next letter!
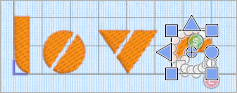 Click Close in Insert Lettering to begin tailoring the style of your lettering.
To select multiple letters quickly, use Command + A on the computer keyboard, or select the Edit Menu and then Box Select to drag a box around all the letters.
Click and hold inside the select box to drag the design into place in the hoop.
Click Close in Insert Lettering to begin tailoring the style of your lettering.
To select multiple letters quickly, use Command + A on the computer keyboard, or select the Edit Menu and then Box Select to drag a box around all the letters.
Click and hold inside the select box to drag the design into place in the hoop.
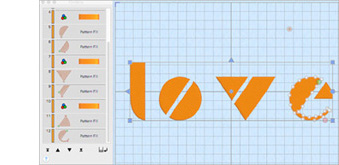 Hold the Alt / Option and Shift keys to adjust the select box size proportionally as you drag by a corner handle,
to keep the select box's center locked in its original location.
Hold the Alt / Option and Shift keys to adjust the select box size proportionally as you drag by a corner handle,
to keep the select box's center locked in its original location.
 Select the FilmStrip
  from the Panels tools to view the inserted objects frame by frame.
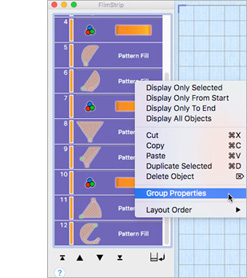
Hold Control and click while the cursor is over a highlighted Pattern Fill frame in the FilmStrip to open a functions menu. Select Group Properties from the menu to change all the selected Pattern Fill objects at once.
from the Panels tools to view the inserted objects frame by frame.
Hold Control and click while the cursor is over a highlighted Pattern Fill frame in the FilmStrip to open a functions menu. Select Group Properties from the menu to change all the selected Pattern Fill objects at once.
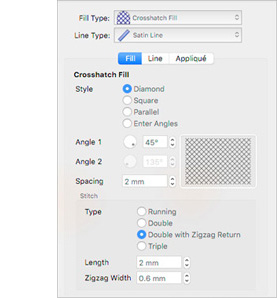 In the Pattern Fill properties box, select from 12 Fill Type options, or 7 Line Type border options to change
all the selected stitch objects at once! Use the properties settings for your selected Fill and Line Types to adjust as desired.
Use Crosshatch Fill and Satin Line to create lace. A Diamond Style, close Spacing such as 2 mm, and Double with Zigzag Return Type build lace elements for truly unique letters!
In the Pattern Fill properties box, select from 12 Fill Type options, or 7 Line Type border options to change
all the selected stitch objects at once! Use the properties settings for your selected Fill and Line Types to adjust as desired.
Use Crosshatch Fill and Satin Line to create lace. A Diamond Style, close Spacing such as 2 mm, and Double with Zigzag Return Type build lace elements for truly unique letters!
Leap into your TruEmbroidery™ 3 package today and get a jump start on fresh, new and creative embroidery design you can truly call your own.

 Icons
Icons , found in TruE™ 3 ELEMENTS or TruE™ 3 ELITE software packages.
QuickFont can generate new TruE™ 3 System Fonts, or machine fonts for use on HUSQVARNA VIKING® or PFAFF® embroidery machines.
, found in TruE™ 3 ELEMENTS or TruE™ 3 ELITE software packages.
QuickFont can generate new TruE™ 3 System Fonts, or machine fonts for use on HUSQVARNA VIKING® or PFAFF® embroidery machines.  page in the Control Panel
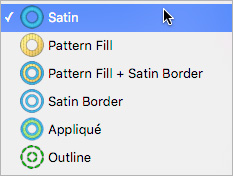
 Satin
Satin  Pattern Fill
  Pattern Fill + Satin Border
  Satin Border
  Appliqué
  Outline