TruEmbroidery™ 3 Software Newsletter January 2016

Welcome to the TruEmbroidery™ newsletter. This month we will share with you how to add stippling to your designs, and how to make your own unique Fill patterns in TruE™ 3 Create.

Flower Icons

icon

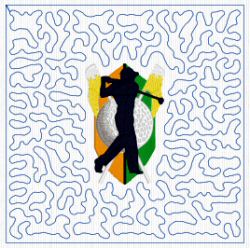
You can add stippling to your designs easily with the QuiltStipple fill QuiltStipple Fill feature in the Create Application. QuiltStipple fill areas use stipple stitches in curved or straight lines. Vary the gap between stitch lines, use running or triple stitch, and add holes.

QuiltStipple Properties

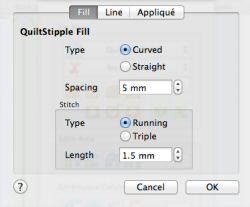
QuiltStipple Fill is found both in TruE™ 3 and TruE™ Create. Select QuiltStipple Fill in the pop-up menu in the Fill Area section of the Create window, then click the button with the ellipsis (3 dots). Choose between straight or curved QuiltStipple lines in the fill. Spacing will set the preferred distance between lines of stitching. The distance can be set from 1 to 5mm in steps of 0.1mm. It is initially set to 2.0mm. If a border is used this is also the distance between the edge of the area and the fill pattern.

Stippling around golfer

Select the stitch type, running or triple for stitching out the fill, and the length of the stitches used. Set stitch length from 1 to 6mm in steps of 0.1mm. The initial setting is 1.2mm.

New to TruE™ 3 Studio in both the TruE™ 3 ELEMENTS and TruE™ 3 ELITE packages is the Quilt Block Assistant where you can easily place the stipple stitches around your embroidery design.

Flower Tips and Techniques

tips and techniques

Can't find the exact fill pattern for your design? This month we will look at how to create your own fill pattern in the TruE™ 3 Create application. This feature is new to the TruEmbroidery™ 3 software, and is available in the TruE™ 3 ELITE package.

On the Edit Menu in TruE™ 3 Create you will find the Manage My Fill feature. Click on Import to create a new My Fill based on a picture. After importing a picture, that fill will be available in the My Patterns MyPatterns category of the Pattern dialog. The height and width of the picture must each be from 120 to 700 pixels.

My Fills dialog

The following file formats may be loaded: Windows or OS2 Bitmap (.bmp), JPEG-JFIF Compliant (.jpg, .jif, .jpeg), Portable Network Graphics (.png), Tagged Image File Format uncompressed (.tiff, .tif), Windows Meta File (.wmf), Windows Enhanced Meta File (.emf) and Windows Icon (.ico).

The picture is automatically converted to black and white to determine the best positions for stitch points. Therefore, the best results are usually obtained from simple pictures drawn in black and white. It's fun to give the fish a pattern of "scales" that look like little fishes. Another idea is to add a picture of the first letter of your name as a MyFill so that you can create a truly personalized QuickFont.

A My Fill pattern is repeated every 0.1mm for each pixel in the source picture. For example, if your picture is 300 x 200 pixels, it will be repeated every 30mm horizontally and 20mm vertically if the fill angle is set to 0. Use your My Fills in designs or lettering!

Best wishes from TruEmbroidery™ 3 Software

P.S. Watch for the TruEmbroidery™ newsletter next month when we will look at the Design Viewer and the new TruE™ 3 Split Project Assistant.