 Tips and Techniques
This month we will review how to select styles and adjust options to create custom embroidered quilt block designs to a precise size with the
TruE™ 3 QuiltBlock Assistant.
The QuiltBlock Assistant steps you through the design process for creating custom quilt blocks to a precise size.
You can size the embroideries to fit a specific hoop for most embroidery machines, or fit to a custom hoop or quilt block size.
Multiple block types offer options for textured or outline blocks, or custom quilting textures around an embroidery.
The QuiltBlock Assistant is a feature of
TruE™ 3 Studio, part of
TruEmbroidery™ 3 ELEMENTS or
TruEmbroidery™ 3 ELITE.
Let's explore the first block style, called Filled Quilt Block; Inner Embroidery.
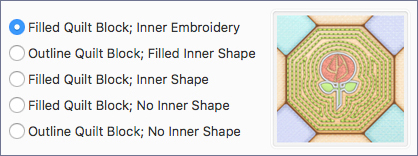
With this block style, you can custom fit quilting stitches around an embroidery,
and then stitch both the embroidery and quilting stitches in the hoop on your embroidery machine.
The Continue button  moves you to the next step in the Assistant. The Go Back button
  allows you to access previous settings in the Assistant.
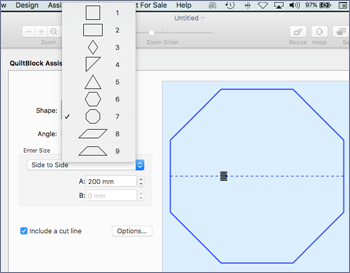 The Assistant steps you through selecting one of 9 block shapes, and entering a block size.
The Enter Size options change with the different shapes. For example, the Enter Size options for block 7, as pictured, are Side to Side, or Side.
Depending on your selection, you can type in a dimension for the A side and/or the B side.
Some block shapes use only the A measurement, and others use both A and B. If the B option is not available the function will be greyed out.
The Assistant steps you through selecting one of 9 block shapes, and entering a block size.
The Enter Size options change with the different shapes. For example, the Enter Size options for block 7, as pictured, are Side to Side, or Side.
Depending on your selection, you can type in a dimension for the A side and/or the B side.
Some block shapes use only the A measurement, and others use both A and B. If the B option is not available the function will be greyed out.
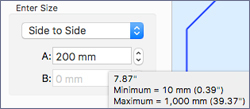 The A and/or B Size settings may be typed in as mm or inches (“), and will automatically convert to your preferences,
as set in TruE™ 3 Configure in the Appearance page. To see the alternate Size units, hold the cursor in the A or B settings box for a pop-up view.
The A and/or B Size settings may be typed in as mm or inches (“), and will automatically convert to your preferences,
as set in TruE™ 3 Configure in the Appearance page. To see the alternate Size units, hold the cursor in the A or B settings box for a pop-up view.
Select “Include a cut line” to add a seam allowance when you plan to finish the block by seaming to other blocks, commonly used in Quilt-As-You-Go techniques. You need to allow for the seam allowance in Enter Size.
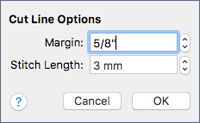 When checked, Cut Line Options include Margin, or seam allowance, and Stitch Length.
Type in the options in mm, inches, or fractions as desired, as they automatically recalculate to your settings from TruE™ 3 Configure.
Uncheck the "Include a cut line" feature if you plan to stitch your quilting design by hooping a pieced quilt top, batting and backing as a 'sandwich', so seams around individual blocks aren't needed.
When checked, Cut Line Options include Margin, or seam allowance, and Stitch Length.
Type in the options in mm, inches, or fractions as desired, as they automatically recalculate to your settings from TruE™ 3 Configure.
Uncheck the "Include a cut line" feature if you plan to stitch your quilting design by hooping a pieced quilt top, batting and backing as a 'sandwich', so seams around individual blocks aren't needed.
The Load Embroidery page, unique to the Filled Quilt Block; Inner Embroidery style, lets you select an embroidery for this block design.
Open Embroidery  browses to folders and files on your computer, shown here with the Fall Maple Leaf from the TruEmbroidery™ 3
Samples folder, Home/TruEmbroidery3/Samples/Studio/Stitch2/Leaves.
browses to folders and files on your computer, shown here with the Fall Maple Leaf from the TruEmbroidery™ 3
Samples folder, Home/TruEmbroidery3/Samples/Studio/Stitch2/Leaves.
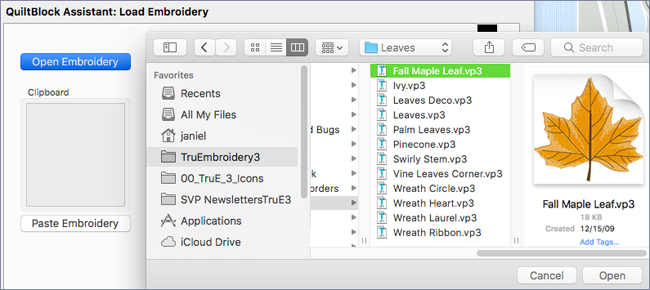
Alternatively, if you have copied or cut an embroidery to the clipboard before opening the Assistant, it will appear on the Clipboard viewer, and you simply click Paste Embroidery
 to bring the design into the Assistant.
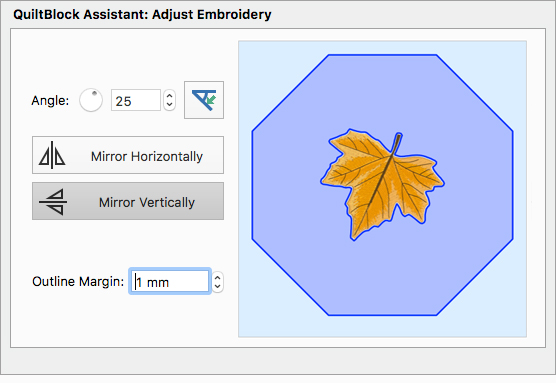
When you Continue to the Adjust Embroidery page, settings include changing the design Angle, Mirror Horizontally or Mirror Vertically, and Outline Margin (distance between quilting stitches and the embroidery’s edges).
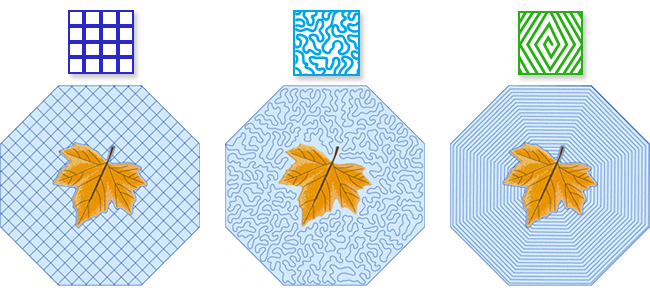
Continue to the Select Fill Pattern page. Here, you can select from multiple types of fills, each with their own specific Options  to adjust and vary the quilting around the embroidery.
 Select Done to create the quilt block embroidery! Be sure to use File / Save to name and back up the design file, and then File / Export to finalize the embroidery for stitching.
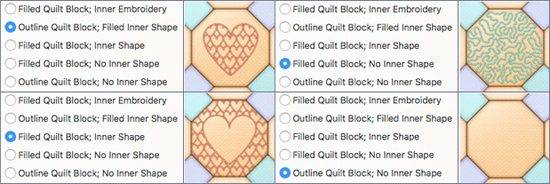
As you select any of the other four block styles, a preview helps you select which type of block you’d prefer to use. Each style of block has variations in the Assistant’s
steps for changing options unique to each block design.
Take a little time today to play with each of the quilt block styles, and then stitch up a sampler table runner or wall hanging to spice up your lifestyle!
Select Done to create the quilt block embroidery! Be sure to use File / Save to name and back up the design file, and then File / Export to finalize the embroidery for stitching.
As you select any of the other four block styles, a preview helps you select which type of block you’d prefer to use. Each style of block has variations in the Assistant’s
steps for changing options unique to each block design.
Take a little time today to play with each of the quilt block styles, and then stitch up a sampler table runner or wall hanging to spice up your lifestyle!

 Icons
Icons . The QuiltBlock Assistant can also be opened from the Assistants menu in the Main Menu bar.
