 Tips and Techniques
This month we will look how to create and edit SuperDesigns in TruE™ 3 Studio. The SuperDesign feature is part of the TruE™ 3 Studio application.
Open the Control Panel  from Panels
  in the top toolbar, the View menu / Show Control Panel
  or use the shortcut keyboard keys, Command G.
The SuperDesign icon
or use the shortcut keyboard keys, Command G.
The SuperDesign icon  opens the SuperDesign Window in the Control Panel.
 Click the Collections menu pop-up
  to view all the different SuperDesign sets.
The SuperDesign shown above is in the Stars Category, Stars 1 set, and Design 1.
to view all the different SuperDesign sets.
The SuperDesign shown above is in the Stars Category, Stars 1 set, and Design 1.
In the Size settings box, set an initial size, and the initial proportions.
You can increase or decrease the Width  and Height
  Percentage independently,
to make the design disproportional if desired, or to adjust a SuperDesign to fit into a specific space within your design.
Percentage independently,
to make the design disproportional if desired, or to adjust a SuperDesign to fit into a specific space within your design.
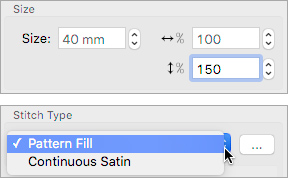 Open the pop-up Stitch Type menu to select from Pattern Fill or Continuous Satin.
The SuperDesign pictured above was constructed as a Pattern Fill. Some SuperDesigns may contain more than one stitch type.
Open the pop-up Stitch Type menu to select from Pattern Fill or Continuous Satin.
The SuperDesign pictured above was constructed as a Pattern Fill. Some SuperDesigns may contain more than one stitch type.
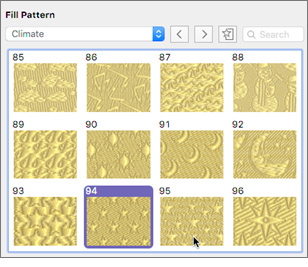 Select the Stitch Type Options menu
  to open the SuperDesign Pattern Fill settings box.
Click Pattern
to open the SuperDesign Pattern Fill settings box.
Click Pattern  to select from 23 Pattern Categories with 252 pre-designed pattern textures,
or from your own personal My Patterns you created with the Edit / Manage My Fills menu in the TruE™ Create
application from the TruEmbroidery™ 3 ELITE package. The second star was customized with the Climate Category, Pattern 94.
to select from 23 Pattern Categories with 252 pre-designed pattern textures,
or from your own personal My Patterns you created with the Edit / Manage My Fills menu in the TruE™ Create
application from the TruEmbroidery™ 3 ELITE package. The second star was customized with the Climate Category, Pattern 94.
Other settings used in our star sample are an Angle of 0 (zero) degrees, Underlay Medium to support the pattern stitches,
Compensation 0, and Gradient enabled and adjusted to a Multicolor Gradient with four thread colors.

After selecting OK to Pattern Fill, Multicolor Gradient and the SuperDesign settings boxes,
click Apply  in the Control Panel to generate the SuperDesign with the selected settings.
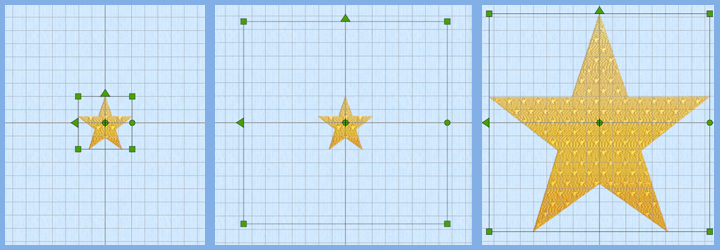
Notice the select box around the SuperDesign element has green corner handles. Green handles indicate the design may be adjusted while retaining accurate Density and stitch quality. The handles will remain green until the design's program window is closed.
Adjusting an already generated SuperDesign is easy.
To change a design's size or shaping, drag a corner handle to adjust disproportionately. Hold the keyboard Shift key and drag a corner handle to adjust proportionally from the opposing corner. Hold the keyboard Alt/Option key and the Shift key together and drag a corner handle to adjust proportionally from the design center. Adjust as many times as desired when the select box handles are green! The design example shown below was adjusted by holding the Alt/Option and Shift keys to resize proportionally from the center.
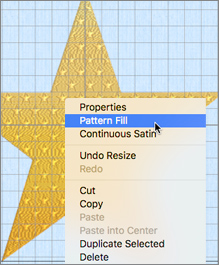 Decide you want to try a different pattern or gradient fill? Just hold the CTRL keyboard key and click over the select box,
then choose Pattern Fill from the pop up menu. Or, choose Properties in the menu, and adjust Size settings as desired!
Decide you want to try a different pattern or gradient fill? Just hold the CTRL keyboard key and click over the select box,
then choose Pattern Fill from the pop up menu. Or, choose Properties in the menu, and adjust Size settings as desired!
Take a little time to jump into the SuperDesign Menu in your TruEmbroidery™ 3,
TruE™ Studio software right away and play with the different options to personalize some new embroidery
designs for your spring projects! SuperDesigns are a great way to get started playing with different stitch
type settings and adjusting designs to fit your own individualized projects!

 Icons
Icons
 feature can help you evaluate your designs before you spend time and materials in stitching your embroideries.